Welcome to Freedom Hold Ranch

Thanks for taking the time to check out my blog.

My intent is to create a survival/preparedness resource for those who are interested in such topics. I will not limit the posts to just information, but also stories, ideas, and other like writings will be available.

Please note – Yes, I know I have type-o’s, I write quickly and edit even faster. Yes, I know my pictures suck, but they mostly are from an old blackberry phone.

If you enjoy the content, and wish to donate, please click this button:

Posted in Admin | Tagged , , , | 1 Comment

Why you need to start stocking food NOW

Part of “prepping” or just preparedness in general is that you have to be proactive about stuff, if you’re reactive to things then you’re stuck in the same situation as everyone else. To do this you have to pay attention to a lot of different things. You need to be constantly (at least once daily) seeking out different sources of information for things that are going on in the world. You need to have a “pulse” on the events of the world so you can see what’s coming before other people do. Over time, you will develop a keen instinct or feel for things and you can adjust yourself, your preps, your family, etc, for those situations. I’m writing this article because I see the potential for a dire situation in the mid-near future. Below are just a few things that collectively raise an eyebrow to me, and they should for you too.
California is in the midst of a severe drought and with summer upon us, it’s only going to get worse. For those of you who think California is full of nothing more than liberal hippies and surfers, consider that California is a major livestock and agricultural powerhouse.
“California is the top producer of agricultural products in the nation. It produces a wide array of commodities but, its single most valuable category is dairy products. In the livestock group, production of cattle and calves is also important to the state, as is, to a lesser degree, the value of California eggs. Broilers can be counted among the state’s top livestock products but, because data are not available, it’s not possible to determine where they rank among the other commodities.

Among a broad range of crop products, California’s greenhouse and nursery products rank at the top of the list. Grapes, almonds, lettuce, and strawberries round out the top five most valuable California crops.”

http://stuffaboutstates.com/california/agriculture.htm

As the State tries to deal with the lack of water, there are several communities that currently have no water at all. Zero, zilch, nothing. The State is pushing residents to cut water use by 28-32% or face increasing fines and fees. This is causing a major push against the agriculture industry. Some farmers have stopped producing crops all together because it is more profitable for them to sell their water rights to other farmers. Some farmers who do not have water rights and cannot afford to purchase water are either going out of business or simply not planting this season. The drought does not affect crops alone, this will spread to the poultry, dairy, and livestock industry as well. If you don’t think California’s agriculture and livestock industry will impact the rest of the world or the country, you’re wrong.

The Federal Government is working with 33 States to try to contain the worst Bird Flu outbreak in our nations history. The article cites 33 million as the number of birds being culled, but the last number I heard on the radio was 40 million. If this outbreak is not contained over the Summer it could likely be made exponentially worse in the fall as millions of migratory birds pass through the flyways potentially spreading the virus.

http://www.foxnews.com/health/2015/05/15/nebraska-declares-state-emergency-in-bird-flu-outbreak/

I was reading an interesting story today about ISIS setting fire to a major Iraqi oil refinery and the potential consequences for the rest of the world if ISIS captures another major oil field. They certainly have the capability to do so. A lacking Iraqi military and an unwilling US Coalition, to me, means this situation is unavoidable. I remember in 2006(ish) when gas prices in California rose to $5 a gallon and diesel rose to $7 a gallon. Many truckers stopped hauling because they could barely break even. At $8 a gallon for diesel, they (the talking heads) estimated that no trucks would haul goods. Think about that.. NO TRUCKS would haul any goods of any kind because to do so, they would lose money with each trip. It takes time for market prices to react to this kind of disruption so a temporary cease in delivery services to grocery stores would be unavoidable. Consider still, in the State’s effort to recoup tax money lost to fuel efficiency they have increased taxes primarily on diesel fuel. Diesel is now in many cases MORE expensive than gasoline even though it is cheaper to produce!

http://www.telegraph.co.uk/finance/newsbysector/energy/oilandgas/11638709/Opec-under-siege-as-Isil-threatens-worlds-oil-lifeline.html

Looking at these issues individually, they are all potentially very bad things. When you start to look at them collectively you start to see the bigger picture. This is what those of you reading this must be able to do. I recently read a very good book by Fernando Aguirre “FerFAL” where he gives advice from having survived the economic collapse in Argentina. One of the things he mentions is, if he could do one thing differently he would’ve had more food. “There’s no reason why you can’t have 6 months – 1 year of food in a first world nation where food is cheap.”

Posted in Uncategorized | 1 Comment

AR-500 Concealed Plate Carrier/Armor Review

You may be thinking to yourself that you’re not a Cop or a Soldier so you don’t need armor. Personally, I think if you are willing to carry a gun then you should also be willing to wear armor (not necessarily on a daily basis, but you should have it for emergencies). Do you really think if you have to use a gun you will be the only one doing the shooting…? Unfortunately though, I have talked to many people who see nothing wrong with carrying a gun everyday, but when you start talking to them about buying armor you suddenly become a crazy person. To a point, I get it.. I mean, when was the last time you trained with your weapon as if you were the one who got shot? For most people, a little one handed shooting is the extent of that scenario. There’s something about our mind that does not let us imagine we are the one who gets shot first, we’re always the winner in our mind.

As someone who has worn all types of body armor for the last 14 years, I have worn some really good armor that I loved, and I have worn other armor that I hated. I picked up the AR 500 Concealed Plate Carrier because I liked the idea of having rifle protection capability in a low profile platform. I think for 99% of the people this is also the most practical form of armor. I personally don’t foresee a time where the average citizen will be wearing an outer load bearing vest, walking the streets of America looking like a Soldier. The reality is most of us may find ourselves in some type of economic collapse scenario and crime suddenly skyrockets, but even in that scenario there will still be some form of Law Enforcement (most likely).

Back to the vest… I would give the AR 500 set up 4/5 stars. Let me start off by saying it appears to be made out of quality, durable fabric. It is adjustable in the shoulder straps with velcro and with an elastic band that secures the abdomen area (common on most armor). The only option available for color when I purchased was Black. The plates slide in from the bottom and once you’re adjusted you’re ready to go. If you opt to get the side armor, the side armor slides into a pouch (almost like an M4 magazine would slide into a pouch and be secured with a flap) and then slides onto the band that secures the back carrier to the front carrier.

There are many videos available on YouTube or other sites that test the effectiveness of the armor plates themselves. From all accounts they appear to be very good plates, only about 1/4″ thick (which is thin in the armor plate world), they have a protective Paxcon coating to catch bullet fragments (important so you don’t catch shrapnel in the jaw/chin as the bullet smashes against the plate), and they even offer a level III+ plate which will stop some .308 rounds. The plates are very affordable at about $80 for the III+ plates. Remember the plates are steel, so they are surprisingly heavy even though they are relatively thin.

The things I did not like about the armor: I wish they would sell a white carrier, white blends better with undershirts and doesn’t show through thin fabric like black does. I ordered the side plates as well, but the pocket for the side plate was so bulky I had to remove the side armor from the carrier for it to be effective as a “concealment” carrier. AR 500 does make a hybrid IIIA plate, which appears to be more of a soft plate overall. I would recommend the soft hybrid plates over the hard plates. You may not get the full rifle protection like you would with the hard armor, but it’s lighter, and since it’s soft it will be more comfortable, and won’t project through your clothes on tight spots (such as across the top of your back/shoulders) like hard plates will. The carrier runs about $130, which I thought was kind of high considering it’s just a sleeve to carry plates..

For the price and quality I would recommend considering AR 500 Armor for those considering a body armor purchase. I would also recommend American Body Armor (ABA) Xtreme Body Armor. I wore their level IIIA vest for about 5 years and then shot it with two shotgun slugs, and a 357 Sig, stopped them all, even after 5 years of wear.

Finally, I do not think you should purchase armor and wear it daily when you are out and about (unless you live in a REALLY bad area I guess..) Consider armor as a specific tool for a specific time, just like you would your storage food, your first aid kit, etc. It has its time and place, but you should not write it off as an unimportant or crazy purchase.

Posted in Uncategorized | 2 Comments

Check out what Derek is up to (from lightweight backpacker fame) here. Some good info on raising your own chickens. – FHR

tolivealovelylie

My room mate Adam and I decided we wanted to raise egg hens, so we got 3 Ameraucanas: Louise, Thelma II, and Thunderbird. They are healthy quickly-growing chicks, and the cardboard box we brought them home in was not enough space for them, so we set out to convert an old wood shed in our yard into a single-(chicken)-family housing unit.

One word about DIY chicken cooping, and especially about converting an existing structure: reconsider. Designing a coop from scratch would be a project by itself. Making that coop fit into a non-square, non-level woodshed is just plain difficult. Especially when the masochism doesn’t stop at site selection, but spills over into materials.

Being a couple of modern sorts, we wanted to be as green as was reasonably convenient, which meant recycling. We had a bunch of scrap lumber lying around the yard, so we decided we could piece together…

View original post 120 more words

Posted in Budget, DIY, Food | Tagged , , , , , , , , | 1 Comment

Leveraging Your Abundant Resources – And How To Make A Wood BBQ

To make a fully-equipped and ready prepper base of operations or retreat you need stuff. Tons and tons of stuff. Knowledge and intestinal fortitude (defined this time as the inner will to do without creature comforts) can lesson the amount of stuff you need, but resources will still be required.

Look around you, what is in abundance? Water? Wood? Dirt? Nottadamn? (as in nottadamn thing – if this is the case, you should think about moving.) Every ecosystem or area has something to offer, but rarely any has everything you need.

In our case, we have tons of wood – a 1000 trees, give or take on just our land… not including the thousands of wooded acres surrounding our ranch. So, looking at the needs of (wo)man, we want to check as many boxes off that could be answered by wood. Cooking and heating come to mind.

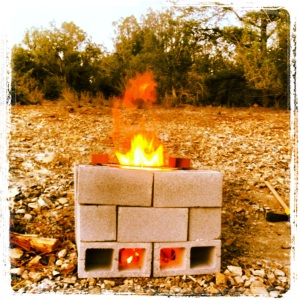
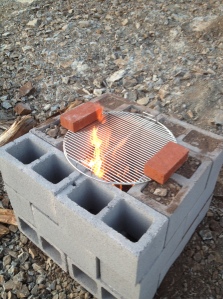
In order to use wood for cooking and/or heating, you most likely need a stove, fireplace, fire pit, or oven. Being the red-blooded, meat-eating, macho American men we are, we decided to make a wood-burning BBQ. Out of cinder blocks. Awesome.

Parts List

18 Cinderblocks
6 Red Bricks
BBQ Grill
4 x Rebar
Dirt and Rocks
Steaks and Corn to Test Functionality

The design is simple, yet sophisticated – the steps to build are as follows:

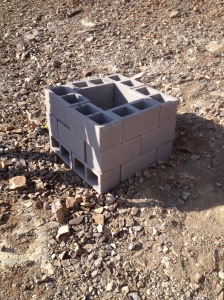
1. Clear a decently level area where you will be putting the BBQ. Make sure the area has little overhanging foliage, and is far enough away from anything that may burn, ignite, or go bang. You can add some dirt or gravel to an uneven area to make more suitable. We actually used a pick to break up the rock hill and surrounding area to make our BBQ ground level enough.

2. Place the cinderblocks into an interlocking pattern, as shown. Note that the bottom blocks to the front of the ‘Q are sideways – this allows for air to come in from the bottom and facilitate wood burning.

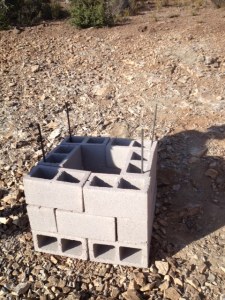
3. Put rebar in the corners of the holes shown. If made correctly, each rebar pole should “weave” through three blocks. Sledge in the rebar until it is below the top of the highest block.

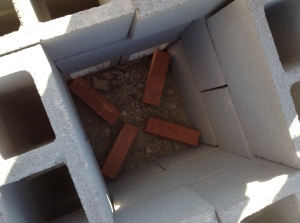
4. Put four bricks in the bottom of the BBQ as shown. This will elevate any wood put in so it will have better air circulation.

5. Use dirt and rocks to fill the cinderblock holes that form the back and side walls of the unit. You could use cement or something more permanent – but I like the fact I could break this down in like 5 minutes and move it, or design something else with the components.

6-11. Fill with wood, light, place grill on top, use bricks to hold down the grill, place meat on grill, enjoy.

NOTES:
We let the wood burn down to hot coals before throwing the meat and corn on, but it was just not hot enough at the grill. So, every few minutes, we moved one of the corner blocks on the front wall and threw on some twigs to get a small flame – this worked perfectly.

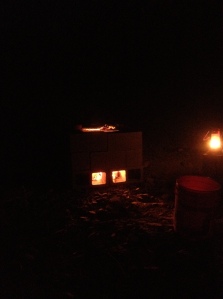
After cooking, we removed the top three blocks of the front wall to make a cool fire pit. When it was time for beddy-bye we rebuilt the wall and threw a block infront of the bottom air holes, and the fire calmed down nicely.

In closing, and as an FYI – the steaks were fricking amazing. Nom nom nom…

Posted in Budget, DIY, FHR Theory, Food, MAG's | Tagged , , , , , , , , , , , , | Leave a comment

After Action Review: A trip to the BOL (Bug Out Location)

A few weeks ago I went out to the ranch, practice runs are the best thing you can possibly do for yourself. It will get you in the habit of knowing where your stuff is, what you’ll need to bring and you will learn your route without needing assistance from a GPS.

On this last trip I was able calculate exactly how many miles it was from where I am to where I’m going, What kind of gas mileage I would get fully loaded, how much stuff I could fit into my vehicle and most importantly How much gas I would need to bring and also, how long it would take to get there.

While en route to the ranch I realized that I would probably need, at a minimum, a secondary route. The route I chose this time was backed up with road construction (something to think about in the spring/summer months) and went through some areas that I would not want to pass through if the SHTF. I was surprised at how tired I got while driving. Having some 5 hour energy drinks or instant coffee in your bug out bag is a must. You never know when you will have to leave, it could be after a long day of work or in the middle of the night.

While at the ranch these were some quick take away things that came up (and some other general ideas we wanted to share):

  • Solar showers work! But unless you want to stand in the mud we recommend a pallet or something elevated to stand on.
  • Have quick foods available. We all have massive food stores in #10 cans and 5 gallon buckets but who wants to prepare that kind of stuff just for a small meal? I personally recommend buying MRE/First Strike Ration components from www.theepicenter.com their prices are good and their products are fresh!
  • Make sure you have something to sit on. I know it sounds silly but depending on how primitive your BOL is, you may need to invest in some folding camp chairs.
  • You can never have enough bins/basins for water. Dirty dishes, rinsing, cleaning, laundry, hygiene etc.
  • You can never have enough bandanas or wash rags. It seems like there is always a need for small towels.
  • Stay organized. It decreases stress and makes finding things easier.
  • Replicate what you have at home. You have a bathroom, so have an organized hygiene area with soap, towels, water, buckets/sinks, etc. this will decrease the stress on those who will have a hard time transitioning from living on the grid to the reality that you may be “camping” for a while.
  • Oil lamps, love them. They work great!
  • Don’t forget the things that may not save your life but will certainly make it more tolerable. Coffee, Chap Stick, sun screen, bug spray, a hat, sun glasses etc. We’ve all had caffeine headaches, they suck. Chapped lips can be horrible. Sunburns can be unbearable especially if they are combined with bug bites!!  
  • Water. You will go through more water than you think. Make sure you have a very large quantity on hand and a way to renew it.

All in all, the trip was good. We got a lot of work done and I look forward to sharing some of the projects with you!

Posted in Uncategorized | Leave a comment

Oil Lamps

A few years ago I was in Virginia during a hurricane and as expected the lights went out. Luckily, I had stocked up on Lamp oil and some oil lamps. Not many people are experienced with oil lamps so I thought I would touch on the subject. First off, I love oil lamps. They are by far my favorite alternative lighting source.

Kerosene vs. lamp oil: Personally, I have used both and I don’t have a preference. Lamp oil is in the same family as kerosene but has been refined to burn cleaner and have less odor. If the grid is up and it’s available I would go for lamp oil but I’m equally comfortable burning clear kerosene in my oil lamps as well. From what I’ve read you can use red kerosene in oil lamps but due to the dye in it, it can cause some health issues so I would only use it outside if I had to. I’ve read several different estimates on the shelf life of kerosene. I’ve read one to five years to people talking about using kerosene that’s 30+ years old with no issues. The long shelf life is another reason why I am a fan of kerosene burning products.

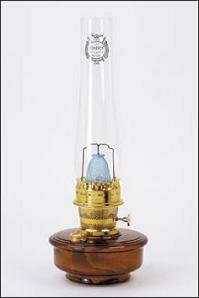
Generally all oil lamps have the following parts: A base, a reservoir (Oil Font), a collar (connects the reservoir to the burner), a burner (holds the wick), a wick and a shade or chimney. I personally like oil lamps with thin chimneys such as an Aladdin or Kosmos lamp. (Yes, we get a kickback if you buy from St. Paul Mercantile. So why not do it!?) The thinner chimney, once heated makes the kerosene burn more efficiently. DO NOT use an oil lamp without a chimney! It could possibly pressurize the reservoir and cause a fire!

One common problem people have who have never used kerosene or oil lamp before is that their lamp produces a lot of soot and smoke. Your wick should be trimmed so that it has the same contour as your finger. It should resemble a half circle on the top, not straight across. Too narrow and pointed, and it won’t burn well either.

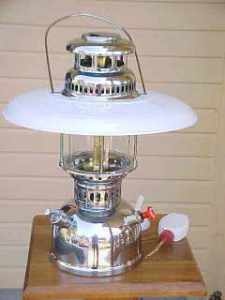
There are pressurized kerosene lanterns but I have no experience with them. I plan on getting one to see how they work, how durable they are and how much kerosene they go through. Once I do I will write about my experience with them. In the mean time, here is a youtube video comparing the a pressure lantern to a Colman lantern. http://www.youtube.com/watch?v=EDuPzQ0qTyE

One thing I cannot stress enough. I don’t care where you buy your lamps or lanterns, DO NOT buy the cheap, tin, made in China hurricane lamps. They leak, they fall apart and they will burn your house down. I know it’s hard to invest a lot of money into something like a lamp but when you need it, you will want a good one that will work safely.

Posted in Uncategorized | 2 Comments

Bug Out Bin Update

If you’re like me, you’ve been prepping for a long time. Over the years you probably have accumulated tons of gear, survival equipment, long term storage foods, guns and ammo. My problem was that I felt extremely un-organized. As if, I had all this stuff but if the mushroom cloud went up and it was time to get out, I would just be grabbing boxes at random, throwing them in the truck and hoping for the best. I brought this issue up with FreedomHoldVP who was having the same issue and we came up with a way to further hone the bug out bin system.

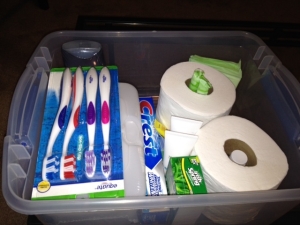
Go into every room in your house and think to yourself “What do I need to duplicate this when the SHTF?” For example: In the bathroom you bathe, brush your teeth, shave/groom, and relieve yourself. So what I did was created a “Bathroom Bin”. In it I put baby wipes, toilet paper, toothbrushes, toothpaste, soap, a towel, I added a solar shower to the large bin, feminine hygiene items, a trowel for digging a toilet, an L.E.D. lamp, deodorant, shampoo/conditioner and a candle.


Then I went through the rest of the house and thought about how to replicate the kitchen, bedrooms, living room and the house overall. The plan is to make small bins for each area of the house and place them in a larger bin for ease and speed when it’s time to go.


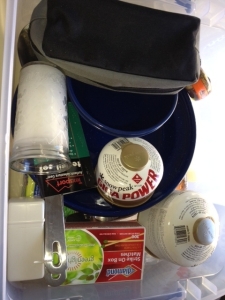
In the above photo you can see I have cooking utensils, a snow peak backpacking stove (small white box), fuel for the stove, matches, a candle, dishes etc. The things that are not seen are the sponges, dish soap, trash bags, L.E.D. light, dish gloves, and drying towel.

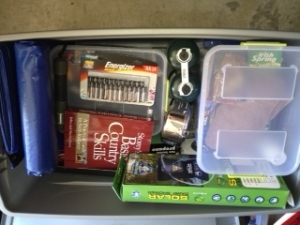
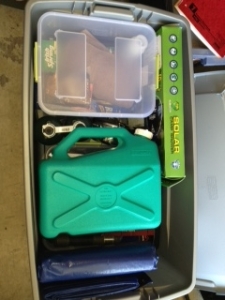
The finished product, for me looked something like this:


Again there are items you can’t see such as an emergency radio, a two burner Colman camping stove, a skillet and there is also a second large bin that has things like my sleeping bags, tent and shelter items, tools, entertainment items and food.

The rules of redundancy always apply. If you need something you should have at least 3 ways to get it. If you need light you should have a flashlight, a lantern, glow sticks, candles, head lamp etc. If you need fire you should have matches, lighters and a ferrocerium (fire steel) rod or flint and steal. By being redundant when something runs out, breaks or gets lost you’re still okay.

Also, the bins are not to replace your B.O.B. the bins are in case you can drive to your B.O.L. but along the way a road may be closed, your area may be quarantined, there may be a car accident or some other obstacle blocking your path. You still need your B.O.B. in case you have to leave on foot.

Posted in DIY, Food, MAG's, Shelter, Uncategorized | Leave a comment

Military Prepper Vs. Lightweight Philosopy, an Interview

Note:  All pictures in this post are original photos by Derek Ruhland (all rights reserved) and that anyone who wants to use them for anything should contact him at derekruhland@gmail.com

Prepping is a hobby that some find a bit eccentric, but many find very interesting. Sometimes, when those in the latter camp ask you questions about your philosophies or techniques, their outside experience provides a different perspective that can be as valuable as advice from fellow preppers. This happened to me recently when a friend of mine read my story “Girl,” and asked me a great question: “Why does she carry so much?”

The following is a recreation of that conversation:

FHR: So Derek, before we get into the lightweight philosophy stuff, tell the readers a little bit about your backpacking credentials.

Derek: Well I started backpacking in the San Gabriels when I was young, and I liked it, but I wasn’t hooked until I took my first trip to the High Sierras with the Boy Scouts of America when I was about 12. I ran for Senior Patrol Leader of my troop just so that I could ensure that the troop would be backpacking-focused. Every year before I got my Eagle, I led 6 – 15 guys on a 10 day trip in the High Sierras, except one year, when we did a 16 day, 150+ mi. hike through the Philmont Scout Reservation. During college I didn’t do much backpacking beyond weekend trips in the mountains east of Santa Barbara, but a year after graduation I set out to thru-hike the Pacific Crest Trail.

FHR: What is the Pacific Crest Trail?

Derek: It is a National Scenic Trail that runs just over 2,600 miles from Campo, California to Manning Park, British Columbia.

FHR: And what exactly does thru-hiking entail?

Derek: Well the mountain passes along the trail are only open between about April at the earliest, and early November at the latest, so there is a short window during which time you can hike the whole trail continuously. That is a thru hiker’s goal, to do the entire trail in one shot, and the time constraint makes it very challenging.

FHR: So you hiked the whole thing?

Derek: No. As with many thru-hikers, injury prevented that. I hiked 1,000 miles from Campo to South Lake Tahoe. I like to say that I thru-hiked the John Muir Trail, and did a serious section-hike of the PCT. But the origins of my failure is actually a large part of why I was so insistent that it would be better for “Girl” to carry less weight.

FHR: OK. Let’s get into that. You say that there may be a potentially dangerous miscalculation in my set up.

Derek: Yea. Well let me just start by saying that I’ve obviously not been thinking about this stuff as long as you have. Before you started telling me about your prepping I didn’t even know normal people took this stuff so seriously. So before I start telling you your business, I just want to clarify that I’m only bringing it up because I had been backpacking for years and had never heard of lightweight or ultralight philosophy, so I thought you might not have either. That being said, I do think that it could really inform some of your decision making.

FHR: OK. Disclaimer accepted. Shoot.

Derek: Well my beef with “Girl” carrying so much goes back to the troubles I ran into on the PCT. Following the timeline of the story, it seems like her and Rob were walking for a good couple weeks. And she was carrying 1/3 her body weight? That is A LOT. Now I know that traditional backpacking wisdom says a pack should be about 1/4 to 1/3 of body weight, but I can assure you that 1/3 is just too much. It’s too much for a recreational backpacking trip, and it’s DEFINITELY too much after shtf and you are thinking about speed and flexibility as serious safety considerations.

FHR: When I hiked the John Muir Trail, I was carrying a pack that weighed something like 80lbs, and I did alright on terrain that is much harder than anything you’ll encounter while fleeing a disaster.

Derek: Yea but you are a beast. And you have told me before that you were in the best shape of your life at the time, and that it was hard. The BOB needs to be packed so that you can effectively carry it whether it’s the week after Christmas and you’ve been feasting for a month straight, or it’s March, and you’ve been dedicated to your resolution for two straight months. Also, for the 95% of the JMT that is part of the PCT, the average grade is never more than an 18% over the course of an entire mile. In “Girl,” it seemed to me that they were doing a lot of off-trail travel, and regardless of how gnarly the mountains you’re walking through are, going cross-country is always going to be more strenuous.

FHR: So what would you say is a good weight?

Derek: Well you are right to base it on body weight. “Boy” can obviously carry a larger number of lbs. than “Girl.” I’d say you should set 1/6th as your goal, and do your absolute damnedest to hit it. Definitely do not settle for anything over 1/5th.

FHR: I wasn’t throwing anything extraneous in that bag. In order to reach those targets I will have to cut a lot of weight. To reduce the weight that much, a lot of important stuff would have to be left behind.

Derek: I know that you very much had weight in mind when you packed the BOB. I just think the calculus was probably weighted more heavily on the side of “benefits of having this,” than “negatives of carrying it.” Not that the stuff isn’t important, but rather that it’s easy to underestimate the downsides of extra ounces if you don’t take into account the cumulative effect of walking all day, every day, day after day, for weeks.

FHR: So you think that a 4 week trip is more than twice as hard as a 2 week trip.

Derek: Exactly. On the PCT, I had only hiked from Campo to just south of Big Bear Lake when I got a stress fracture in my left foot. That’s about 275 miles. Like I said earlier, I had done multi-week backpacking trips before. On that Philmont trip I even got close to 200 miles. But like you said, the effect of the miles on your body isn’t linear.

FHR: So how much did your PCT pack weigh?

Derek: When I started the trail, I weighed 210lbs, and my pack weighed about 37 with food and water. That’s about 1/6th.

FHR: But you said that 1/6th – 1/5th was a decent range, and here you broke your foot carrying the low end.

Derek: Well those ratios should be a little bit flexible. All body lbs. are not created equal. When I started, I was 20lbs. over trail-fit weight. That’s essentially the same as carrying 20lbs. of extra packweight. If I take those lbs. off my body weight, and put them on my pack weight, my ratio goes up all the way to 1/3rd. Obviously you cannot actually factor in extra bodyweight like that when you are calculating the packweight ratio of your BOB, but you should definitely keep it in mind. If you are overweight, maybe you should adjust the ratio to 1/7th – 1/6th, whereas if you backpack every weekend and your legs and general low-level cardio are in absolutely peak condition, then you could probably adjust it to 1/5th – 1/4th.

A special caveat here: if you are super jacked, your physical prowess does not necessarily translate to your ability to carry a load over long distances. Large muscles, especially those of the upper body, but even to a certain extent leg muscles, might easily be placed in the “extra weight” category. You just don’t use them walking long distances at speed. Nothing speaks to your ability to do that other than how much time you have spent doing it. Obviously runners will be better off than body builders, but even running is a different kind of endurance. Low-level cardio is a fitness all its own.

FHR: OK. So basically your thesis is that an injury is more of a problem than not having any particular piece of gear.

Derek: Yes. Well that’s an important part. In a post-shtf world, a broken foot would be a disaster. I could barely walk, let alone walk and carry a pack; and I definitely would have been useless if a situation warranted any kind of evasive movement. If “Girl” had had a stress fracture when those baddies found the jeep, Rob would have had to kill a bunch of fools in order to save her. And a stress fracture isn’t the only thing to worry about when it comes to heavy pack weights. You could develop patellar tendonitis, or you could get shin splints. You are also more likely to get blisters. That may not sound that bad, but let me tell you, a really deep blister will incapacitate you, or at the very least cause you to hike in sandals, which, as I found out on the PCT, is just asking for trouble.
FHR: So you said weight is one part, what are the other parts?

Derek: We’ve talked about the negatives of carrying a heavy pack. I’d also like to point out some positives of carrying a light pack. Say you are carrying a pack that is 1/7th of body weight. That pack is not a burden. If your harness fits you correctly, you won’t even really notice it. By the time I got to the JMT, I had shed 10 lbs of packweight and 20lbs. of bodyweight. When I was running low on water, my pack weighed about 20lbs, meaning that I had gone from an effective ratio of 1/3rd to an actual ratio of under 1/8th. I found myself leaving my pack on during lunch breaks without even noticing. When your pack is that light, you find yourself doing everything – eating, resting, going to the bathroom – with your pack on. In a shtf situation, that would be a major bonus. If “Girl” was carrying 1/3rd her body weight, she was taking that thing off every chance she got. When the pack was off, if there was a need to make a quick get away, she’d either have to take time saddling up, or she’d have to abandon her stuff.

FHR: OK. That makes sense. Any other benefits?

Derek: Definitely. Scouting is so much less a task when you are carrying a light pack. Instead of leaving one person with the gear while the other runs a ridge to see if there are hostiles ahead, or hikes down a canyon to see if there are any good sleeping spots near the water source, you can just both go with your gear. That way, no one has to split up, and if there is a good camping spot, no one has to back track. You just set your stuff down and your home. Or, if there are hostiles on the trail, you can set out on your detour from your current position, keeping the hostiles in view the whole time, instead of walking back down to the gear, during which time you would have no idea of their movements.

FHR: That one I like a lot.

Derek: There’s one more thing. Being physically exhausted makes everything harder. It makes setting up your tent a chore. It makes pumping water a task. It makes doing dishes nearly unbearable. In a shtf situation, it would make doing perimeter checks more of a burden, and it would make staying up on watch almost impossible. You get the idea. Now that may not seem like a big deal. It’s a survival situation right? People will just sack up and take care of business. That’s true, but ask anyone who has been in a survival situation, making it out alive is 99% mental. The will to live is your most important weapon, and exhaustion will eat away at moral faster than the government can spend money. Also, exhausted people make stupid decisions:

“Let’s just cross this skree field instead of going around.” Broken Ankle.

“There’s more water in 2 miles, just fill up one nalgene.” Seasonal stream. Dehydration.

FHR: OK. So you’ve laid out your logic on why you should carry a light pack, and it seems sound, but you didn’t really address the obvious question: what do I leave behind. It’s not like “Girl” was carrying around a hair straightener. If shtf, you need the guns and ammo and the water filtration, and all of that stuff is heavy.

Derek: This is where we get in to the nerdyness of going light. The first thing you have to do is buy a digital scale that reads accurately by the oz. Then start by weighing your big three.

FHR: Big three?

Derek: Your tent, your sleeping bag, and your pack. Check to make sure that none of them are way heavier than necessary. Most people don’t think about the pack, but it is one of the heaviest pieces of gear you carry. Some people who get their packweights really low opt to carry frameless backpacks in order to further reduce weight. Personally I don’t endorse this. I’ve never owned one, but I did a lot of research, and from what I read they become very uncomfortable with packweights above 20lbs. Being miserable carrying 20lbs seems silly to me when you could be perfectly happy carrying 22lbs. with a frame.

FHR: What about the tent?

Derek: Definitely look into tarps or tarptents. Anything you can pitch using only chord, or only a trekking pole and chord. I used a Z-packs Hexamid Solo. It’s unique in that it’s one of the only tarptents that’s long enough for me, and includes bug protection. It only weighs 16oz, including steaks. I don’t really want to get into gear specifics though. This post would be 50 pages. Instead, I’ll just say check out backpackinglight.com (BPL). You have to sign up and pay for a membership in order to read most of the articles, but as a one-time expense, I’d say it’s definitely worth it. Anything you want to know regarding going light is on that website, and they have gear reviews of all the obscure, guy-in-his-garage gear companies that you might not be able to find otherwise. Most of the best ultralight gear is being made by a few passionate dudes in a workshop, and is only sold on-line, so having a spot where you can go and find out about all of it is pretty invaluable.
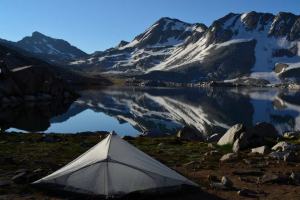
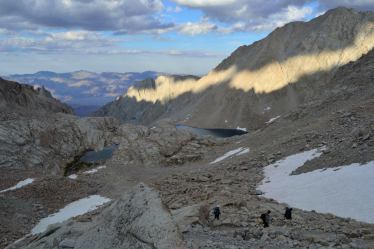
This is the tarptent I used next to Wanda Lake, elev. 11,463

FHR: Any general advice on the sleeping bag?

Derek: Just that you need to consider where you live. If you live in Southern California for instance, you will never need a bag rated to 0 degrees. Get a bag or quilt rated to 30 degrees, and wear all your clothes to bed. Remember whenever you are considering a piece of gear, this is not a pleasure cruise. It might not be ideal to sleep in every item of clothing you brought, but it will be worth it during the daytime when you are carrying that stuff.

FHR: So once you get your big three dialed in, then what?

Derek: Then comes the hard part. You need to take that digital scale, weigh every single piece of gear, and make difficult decisions. I look at it like weight watchers versus a crash diet. You don’t cut out all carbs (read: binoculars). Instead, you bring the binoculars if they are important to you, but skip the chicken wings the next day (read: lighter sleeping bag). This may sound incredibly nerdy, but before the PCT I weighed everything, then created a chart of what percentage of my packweight each item, and category of items, accounted for. Then I took those percentages and compared them against how much I suspected I would value that, or those, items. Camera equipment accounted for over 1/5 of my total pack weight. I gave up an insulating layer but kept all the camera equipment and never regretted it for a second. In your case, guns and ammo could be that 1/5th. The trick is just to think of that goal number as a hard cap. As in “29lbs. is my ceiling. My pack weighs 2.5lbs, my sleeping bag weighs 1.8lbs, and my tent weighs 1lb. I have 315.2 oz. to play with. PERIOD.” The ultimate slippery slope is when you look at small stuff and start saying, “well this bandana is over weight, but it will be worth it.” If it’s worth it, cut something out.

FHR: So when you say “packweight,” are you talking about just gear, or does that include food and water.

Derek: I’m sorry. I should have defined terms earlier. That absolutely includes food and water. When you calculate your packweight you should include the maximum amount of food and water that you are ever likely to carry during your trip (escape). The weight without food and water is your baseweight. The baseweight is obviously what you are going to be making most of your adjustments to, but that’s not to say there are no improvements you can make to your food especially in order to reduce weight.

FHR: Like what?

Derek: It’s a common mistake to think that the lightest food is the best. A lot of the classic backpacking staples, like top ramen, are light in terms of oz/meal, but when you factor in how nutritive they are, it becomes apparent that you could be doing better. In general, if you maximize calorie density, you will minimize weight and maximize nutrition. Things like peanut butter, salami, cheese, and any kind of nut are very calorie dense. My favorite calorie densifyer* is olive oil. Instead of bringing two packages of freeze dried food, bring one and pour a bunch of olive oil into it. You will get more calories/oz from the olive oil that you added than you would have from that second beef stroganoff. That is what you are looking for: calories/oz. When the shtf, and you are running out the door, grab some snickers and a couple of unripe avocados. The snickers are the best instant energy boost that exists, while avocados keep gloriously in a backpack for 2 or 3 days and are super calorie dense.

FHR: Interesting. Anything else on food?

Derek: Yea just one more thing. Timing is everything. Remember how I was saying that ramen isn’t a great backpacking food? Well that’s not entirely accurate. Ramen is actually a pretty decent lunch. It’s just a terrible dinner. The carbs in ramen are good fuel if you have more hiking ahead of you, because they are easy for your body to break down. Ramen is also very salty, which is good because your body will lose salts as you sweat throughout the day. But most people eat their hot meal for dinner, and ramen is a bad dinner food for two reasons. The first is because it is low in protein. After a long day of walking, your body needs protein so that it can rebuild torn muscle fibers during the night. It is also a bad dinner because most of its calories come from carbs, which means that most of the fuel will be spent before the night is over. This isn’t a big deal when you are at home, because you are in a nice comfy bed, but if you have brought a sleeping bag that is a good balance between warmth and weight, then you will need that metabolism to be going all night in order to keep you warm. The best dinner foods are high in protein and fat, which burns slow but very hot. That is why I like to switch up my hot meal and cold meal. I cook at lunch, because most hot meals are high in carbs, and I eat my cheese and salami for dinner. In a shtf situation, cooking at lunch would also be good because your fire or stove would be less visible during the day.

FHR: OK. Well thanks for doing the interview. Anything else you want to tell the readers before you go.

Derek: Carry little, resupply often. Caches are your friend. You shouldn’t have anything on your back that you do not absolutely need between Point A and Point B. If you can’t get your baseweight down far enough to bring your packweight below your goal, just put more caches along your route. That way you wont have to carry as much food.  If you stock those puppies up and go from one to the next as fast as humanly possible, you will be safer and less prone to injury.

FHR: Good stuff. Thanks again.

*made up word
Posted in FHR Theory, Food, Training | Tagged , , , , , , , , , , , | 3 Comments

Survival Potatoes

20120508-204220.jpg
Note: I am writing this post using the wordpress app – If it looks messed up, I’ll round back and fix it.

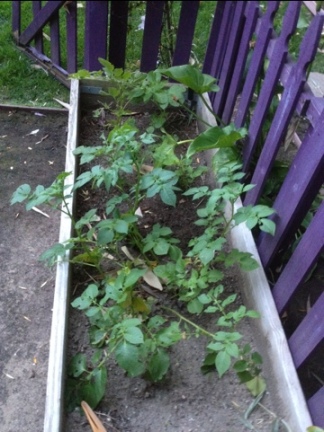
Potatoes are an amazing source of calories, and I just found out recently super-fricken-easy to grow.

The process is quite simple:

– Take a potato and cut it up into pieces. (I used one left in a sack I got from the supermarket.)
– Each piece should have a good “eye”, from this the plant will grow.
– Dig a small hole in your dirt, a few inches deep, and drop the potato piece in, with the eye facing upwards.
– Cover with dirt, and water. Continue to water every once and a while.

The pic at the top is all from only one potato from the store, about 8 or so plants. I planted them about 6 weeks ago.

Tonight, I dug one up (the worst looking of the lot), just to see how things were coming along. I got 3 small egg sized potatoes and one the size of a big raisin (don’t you love my specific measurements?) Not one to let things go to waste, I cooked these bad boys up with some olive oil, salt, and pepper – fantastic!!!!

20120508-204424.jpg

The piece I planted was nowhere to be found… It must have been used up to create these little guys and the plant. I found the whole process amazing, and quite impressive on the possible volume that can be created from just one “seed” potato.

I am in the process of moving again, this time to a more permanent situation (I’m buying a house) Once I move, I’m going to try the potato ring method, and see how much I get out of it. Don’t worry, a writeup will follow.

Try it yourself, potatoes are easy to grow!

Posted in DIY, Food | Tagged , , , , , , , , , , , | Leave a comment

Painting Your Tomahawk… The Cheap Ass Way

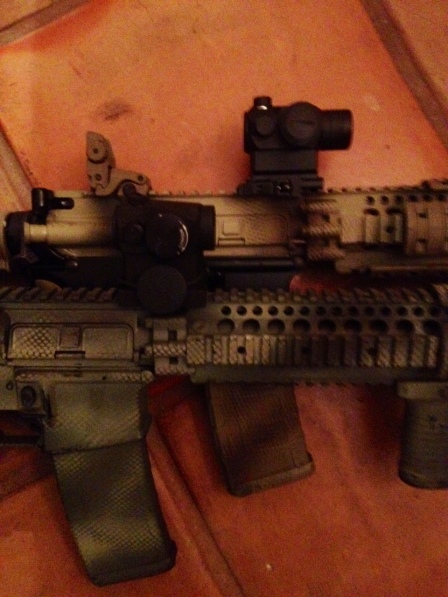
A while ago I posted a blog on how to paint your rifle, the cheap ass way (HERE) with detailed instructions on a way to paint your rifle.

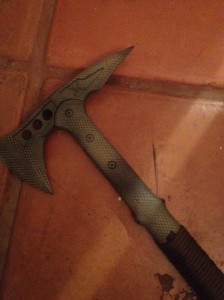
I wanted to demonstrate another way to paint “tactical” gear, and took a whole bunch of pictures on my phone of the process…. Then I got rid of my phone, and the pictures with it before I could write it up – so you will have to make do with before and after pictures and instructions in between.

  1. Prep your item, in this case a M48 Hawk by United Cutlery (Amazon,) clean the outside with a good degreaser, and scruff up the whole Hawk with some sandpaper.
  2. Give a good base coat of paint, I used Krylon’s camo line in green(Amazon – use this for reference only, the price seems high. your local Walmart or Ace should have some).
  3. After drying, hit it with a few stripes of a contrasting color, I did brown.
  4. After drying, place inside a mesh laundry bag (I snagged an extra one my wife had for my new baby, found at BabiesRus), and hit it with shots of your third color, in this case kakhi.
  5. Add extra cool-guy features, such as wrapping the handle in paracord. DONE!

You can, of course, use the same technique on rifles, knives, pumpkins, or small children.  You can alter the colors in the order they are layered, the quantities of those colors, and even the color selection.

Enjoy, and get painting… the cheap ass way

Posted in Budget, DIY, Firearms | Tagged , , , , , , , , , , , | 2 Comments